Google
 

March 31, 2009

Strawberry Almond Cake


Although it was Arundati who sort of pushed me to use fresh fruit in my cakes, Pritika is the one who has eaten the fresh fruit cakes that I've baked. She is most definitely my best PR person. She places orders for cakes with amazing regularity and gives them away to others. It's her way of "getting them hooked", she says. We moved from being just colleagues to being good friends and it has been a wonderful journey. She celebrated her birthday in March and a week later, we invited her along with her husband for dinner. Since she loves fruit in her cake, S brought a box of strawberries. I made this cake by giving a little twist to the strawberry cake I made earlier.


1 cup Flour

1/4 cup Almonds, coarsely powdered
1/2 cup Sugar
2 tsp Baking Powder

1/4 tsp Baking Soda
a Pinch of Salt
1/2 cup Milk

1 cup Strawberries, chopped
1/4 cup Oil
1 tsp Almond Essence
1 Egg, beaten

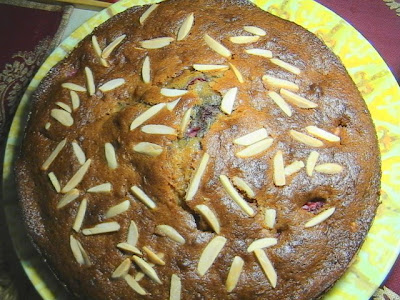
Slivered almonds for garnish


Preheat the oven to 350F (180 C).


Grease and flour/line an 8-inch cake tin.


Sift the flour with the baking powder, baking soda and salt. Add the powdered almonds and mix well.


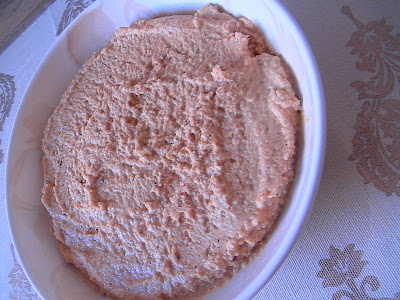
In a mixing bowl, add the egg, milk, sugar, oil, and almond essence. Beat well together. Add the flour mixture to this and blend well. Add the chopped strawberries and mix well.


Pour the batter into the prepared cake tin. Decorate with slivered almonds and bake for 30 minutes or until a knife/skewer, inserted into the centre of the cake, comes out clean.

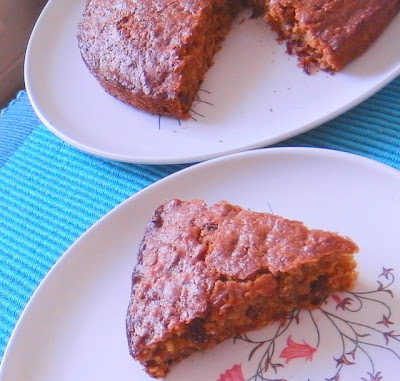
We cut the cake after dinner and relished a slice each. I packed the rest of the cake for Pritika to take back with her. (She told me later that she wouldn't have had it any other way.) Have a lovely year ahead P!


I'm sending this to Go Nuts-Almonds hosted at Tasty Treats.

March 29, 2009

Rajma


When I first planned to visit VaishnoDevi in November 2000, some colleagues said to me, "वहाँ पर राजमा चावल और छोले पूरी ज़रूर खाके आना।" (You must eat Rajma Rice and Chhole Puri there.) When I did eventually go a month later, I decided that I would try these two things. When we got there, I figured that these were the ONLY dishes available, on the way and at the venue. If I had to eat, I had to eat one of these. I am told that things have changed a great deal in the last decade.


Anyway, that was probably the first time I tasted rajma chawal outside my office cafeteria. I liked it quite a bit. There's also something about being tired and hungry during the climb in the cold that makes food taste extra special. I didn't try making it at home because our cafeteria made it at least 3 times a week. In fact there's this other story that's linked to Rajma.


One Sunday afternoon, I was rather sick of all the dal makhani, chhole, paneer and rajma. I didn't feel like making an elaborate lunch. (I didn't own a fridge then and stashing away leftovers in the August heat in Gurgaon isn't exactly a cakewalk.) I made myself some Tomato Rice. Just as I sat down to eat my lunch, my landlady's 7 year old rang my doorbell. He said, "मम्मी ने कहा की आप अकेले खाने के बजाय हमारे साथ खा लें।" (Mummy says that instead of eating alone, you should come have lunch with us.) I told him to thank her but also tell her that I'd already made my lunch. He was back in 2 minutes saying, "मम्मी ने कहा की आप अपना खाना लेकर नीचे आ जाएँ। हम साथ बैठकर खायेंगे। (Mummy says that you bring whatever you have cooked and we shall all eat together. Now, there was little I could do. I took my pressure pan downstairs and we got ready to eat. My landlady had made a special Sunday lunch: Rajma Rice. My tomato rice was polished off in no time by the four of them and we can all eat I was served more rajma rice. So much for wanting to not eat something.


1 1/2 cups Kidney Beans (Chitra Rajma), soaked overnight

2 Onions, ground to a paste

1/4 cup Tomato Puree

1 tsp Ginger Garlic paste

1 tbsp Oil

1 tsp Cumin Seeds

1 tsp Coriander Powder

1 tsp Chilli Powder

1/4 tsp Turmeric Powder

1/4 tsp Garam Masala

Salt to taste

Coriander Leaves for garnish


Pressure cook the kidney beans with 1/2 tsp ginger garlic paste in 3 cups of water. Drain the beans and retain the water.


In a pan, heat the oil and add the cumin seeds. When they crackle, add the onion paste and fry for a couple of minutes. Add the coriander powder, chilli powder, turmeric powder and salt and fry for a minute. Add the tomato puree and fry until the oil leaves the mixture. Add the cooked beans and the garam masala. Add the reserved water and boil the entire mixture. Garnish with coriander leaves.


Serve this with plain rice or Jeera Rice. I was serving it with rotis and so made it rather thick. When serving with rice, make sure that it has a pouring consistency.

I made rajma several times before and found that the beans didn't cook. I soaked the beans over night and then pressure cooked them for 20 whistles once. Rock hard! My colleague, P, told me to buy Chitra Rajma and ever since, the rajma I make is creamy. Thanks P.

March 28, 2009

Kidney Bean Green Chickpea Patties


Snack time. If I'm not prepared for it, I dread it. I dread not having something substantial in my lunch bag. I dread having to reach out for "just about anything" to kill those hunger pangs. It's not fair that the cafeteria downstairs serves samosas, bread pakodas and bread pizza just when the last bit of lunch bids my stomach farewell.


This makes for a great snack. With a salad on the side, it would make a great lunch too. But for now, let me relish it at snack time.

1/2 cup Kidney Beans, soaked overnight and cooked

1/2 cup Green Chickpeas, cooked

1 Potato, cooked and mashed

2 slices Bread

1 tsp Chilli Powder

1/4 tsp Turmeric Powder

1 tsp Ginger Paste (optional)

1/2 tsp Garam Masala

1/2 tsp Paneer Tikka Masala (optional)

Salt to taste

Oil for frying


Place the kidney beans, chickpeas, potato and bread in a bowl and mash until you get a homogenous mixture. Add the ginger paste, turmeric powder, chilli powder, garam masala, paneer tikka masala and salt. Shape the mixture into patties. (I got about 6-8 patties from this mixture.)


Heat a skillet and smear a little oil over it. Place the patties on the skillet. Cook on both sides until golden brown. Your perfect snack for those post lunch pangs.

March 27, 2009

Mugga Dali Kheeri for Yugadi


Most of my posts are on auto publish these days. The posts were written over many weekends when I had little else to do. While I tend to post every alternate day (so that I won't suddenly find that my pipeline has gone dry), just for today, I decided to play around with the schedule. I usually do that when there's something special I want to talk about. A birthday or a festival usually makes it to the list.

This blog hasn't seen too many "festival" specials. There are many reasons for that. The biggest reason is probably the time lag between the making and the posting. And honestly, I don't even "make" that much. Is it a sign of the times, is it a sign of my laziness, is it just me asking the question why? Each time, I'd probably pick "lazy". Then again, I have a job that keeps me at work for more than 9 hours a day and the commute usually takes up another 4. So, if I even manage to "make" anything festival related on the actual date of the festival, I would be too tired to talk about it here. After a few days or weeks, it seems so out of place. Maybe I should talk about them the following year. Like I remember taking pictures of our Pongal feast last year. I managed to sneak one of those pictures into this year's post.

While I am not in favour of celebrating every festival around the weekend closest to it (I mean, what is the point?), I have to resort to doing just that, at times. Often, I make one dish that is part of the meal for that festival and leave it at that. Something is better than nothing, right? As this new year begins, I am caught between the past, the present and the future. Will the traditions of my family carry on? Growing up, I had to contend with Konkani festivals and Tamil festivals. Now I have added a third dimension, Telugu festivals. I'm glad that many of them coincide. It is the new year for us (on my mother's side of the family) as well as for S' side of the family. (And for all of you out there who call this the Telugu New Year, please, please, I beg you to stop doing that. It is the New Year for anyone who follows the lunar calendar in India.)


My MIL said that the sweet dish that they make for today is Bobatlu (Punpolo in Konkani, Poli in Tamil, Puranpoli in Marathi). Among other things, Saraswats make this kheer with green gram dal. It is anyone's guess which I'd pick to make today. Much as I'd love to eat the Bobatlu, I'm not even going to think about making it on my own today. (I have made it a couple of times in the past. Feels like a different life though!) Today it has to be Mugga (Moong) Dali (Dal) Kheeri (Kheer). We also make panak (I shall blog about it later as we make it for a different festival too - same as the Tamil Panakam) and usli.


Here's the recipe:


1 cup Green Gram Dal (Moong Dal)
1/2 cup Coconut Milk
2 tsp Ghee
3/4 cup Jaggery
1/4 tsp Cardamom Powder


Heat the ghee in a pressure pan. Add the green gram dal and fry for a few minutes. Add about 3 cups of water and and pressure cook for 3 whistles. Add the jaggery and cook for 5-7 minutes. Blend in the coconut milk and the cardamom powder.


There you go. There couldn't have been a simpler way to make kheer. And there isn't a sweeter way to usher in the New Year. I don't have access to Neem leaves and flowers and as a result, I am not making the Telugu Ugadi Pachadi or the Konkani equivalent (which is very similar to this and has raw mango as well) . For today, I will just have to make do with this bowl of kheer. May you and yours enjoy a lovely year.

March 25, 2009

Tomato Semia Pulao


One morning, I decided I wasn't in the mood for rice. I definitely didn't feel like making chapattis. And for some vague reason, even upma didn't seem like a good option. Then I remembered reading this recipe years ago on a vermicelli packet. It seemed perfect for that morning. It gave me that kick which I get from trying something new. And it tasted great in our lunch box.


2 cups Roasted Vermicelli

2 Onions, sliced

4 Tomatoes, chopped

1 tbsp Oil

2" Stick Cinnamon

2 Cloves

1 Green Cardamom

1 tsp Green Chilli Paste

1 tsp Ginger-Garlic Paste

1/4 tsp Turmeric Powder

1/4 tsp Chilli Powder

Salt to taste


Heat the oil in a pan. Add the cinnamon, cloves and cardamom. Add the onions and fry for a minute. Add the chilli and the ginger-garlic pastes and fry for 2-3 minutes. Add the chopped tomatoes and fry for another couple of minutes. Add the turmeric and chilli powders along with the salt. Add the vermicelli and mix well. Add 4 cups of hot water and cover and cook for 5 minutes.


Enjoy this with some cool raita on the side.

March 23, 2009

Zucchini Turnip Stir Fry


Roti-sabzi, Pulao, even cutlets. All of this can get boring on a day to day basis. Maybe I won't tire of pasta that quickly. I haven't tested myself in that area. Not that I plan to in the near future. I had to use up my winter bounty and decided to make this stir fry. I had not cooked with turnips before. I'd only eaten turnips in this pickle.


I made a simple stir fry that we had with some cooked cornmeal. The combination was very nice and our lunch plate was colourful. I didn't get a chance to take a photo of my lunch plate. (That would be too much, wouldn't it? Even if everyone at work knows I'm a food blogger!)


2 Zucchinis, cut into 2" sticks

2 Turnips, peeled and sliced

2 carrots, peeled and cut into 2" sticks

2 Onions, quartered

2 Tomatoes, quartered

1 tsp Chilli Flakes

1 tsp Basil

1 tsp Parsley

1 tsp Oregano

1 tsp Garlic, chopped

Salt and Pepper to taste

1 tbsp Olive Oil


Heat the oil in a pan. Add the onions and the garlic. Add the chilli flakes, basil, parsley and oregano and fry for a minute. Add the tomatoes, zucchini, turnips and the carrots. Add the salt and pepper. Cover and cook till the vegetables are done. Serve hot with rice or cooked corn/wheat meal.


I'm sending this to Divya as she hosts this month's edition of Think Spice... Think Pepper.

March 21, 2009

Savoury Cookies


We've finally started having a few get togethers at home. On a regular basis. It isn't like we haven't ever thrown a party before. We just haven't thrown as many as we'd have liked to. And we're attempting to change that.


Some of the parties that we hosted earlier were main meal intensive. I've found that those work best when there is little or no alcohol doing the rounds and/or when there are children at the party. A drink to start with, some soup, a couple of starters, a pulao, a dry side dish, a gravy side dish, rotis, dal, salad and dessert.


This formula doesn't work well for every kind of party though. Many of the parties that we attend and host are snack intensive. By dinner time, no one really wants dinner. There's a limit to the amount of namkeen or chips that one can comsume. "Hot snacks to the rescue" I hear you say. But I don't quite like the idea of slaving over the stove. So I make different kinds of baked cutlets/patties. But then again, there's only so many that one can make. I thought that savoury cookies might make a great snack. And the added benefit was the fact that I could make them much ahead of time and just bring them out at the time of the party.


The night that I made these, the plate was empty in no time at all. The first reaction that people had was "butter". I did use butter, but 6 tablespoons of butter that I used in the dough gave me about 60 cookies. So, that's not all bad. Here is the recipe I used (cross between a recipe in the cookie book and Amma's Nankhatai):


1 1/2 cups Flour

1 1/2 tsp Baking Soda

1/4 tsp Salt

6 tbsp Butter

2 tbsp Coriander, chopped

1 tsp Egg Replacer, mixed in 2 tbsp water (Or 1 Egg)

1 tsp Garam Masala

1 tsp Chilli Powder/Paprika


Preheat the oven to 400F.


In a bowl, mix the flour, butter, baking soda, salt, garam masala, chilli powder till the entire mixture resembles bread crumbs. Fold in the egg replacer mixture and the coriander leaves and mix into a soft dough.


Make small balls of this mixture and flatten them on a cookie sheet. Bake for 12-15 minutes.


These are not only great with cocktails, but even with a cup of coffee or tea. A great alternative to sweet biscuits.

March 19, 2009

Moong Methi Pulao


I set out one Monday morning to make some Methi Pulao with Moong Dal. I'd even remembered to soak the moong on Sunday evening. But when I woke up, I realized I was feeling lazy as always. Two dishes seemed like too much work. So, I just added the soaked moong to the methi-rice mixture and the resultant dish was very nice. A dish with the lovely flavours of pulao, with all the benefits of a khichdi.


1 cup Basmati Rice, washed and drained

1/2 cup Moong, soaked overnight and drained

1 cup Fenugreek Leaves, chopped

2 Onions, sliced finely

1 tsp Oil

1" stick of Cinnamon

2 Cloves

2 Pods Cardamom

1 tsp Peppercorns

½ tsp Cumin Seeds

¼ tsp Asafoetida

1 tsp Chilli Paste

1 tsp Ginger-Garlic Paste

Salt to taste


Heat the oil in a pressure pan. Add the cumin seeds, cinnamon, cloves, cardamom and peppercorns. When they crackle, add the asafoetida and the onions. Fry for a few minutes. Add the chopped fenugreek along with the chilli and ginger-garlic pastes and fry for 2-3 minutes. Add salt, moong and 2 1/2 cups of boiling hot water. Pressure cook on a low flame for 3 whistles.


We had this pulao for lunch with a simple raita. A dish that I'm certain to make again. But this time, I'll send it to Divya as she hosts this month's edition of Think Spice... Think Pepper.

March 17, 2009

Lal Lobia Curry


There are several kinds of lentils which I don't have access to in Delhi/Gurgaon. Pigeon Peas and Hyacinth Beans would rank on top of my list. I use my stock so sparingly that I don't touch the last packet I have until I have received the next batch of supplies. All the same, I do use lentils quite regularly.


In an attempt to widen my "range" of lentils, I bought a packet of Brown Cow Peas (Lal Lobia in Hindi, Bagdo in Konkani). I soaked some one night, but I had no clue what to do with it the next morning. I made this simple curry for us to eat with chapattis. I quite relished it.


1 cup Brown Cow Peas, soaked overnight and drained

1 Onion, ground to a paste

1/4 cup Tomato Puree

1 tsp Ginger Paste

1 tsp Garlic Paste

1 tsp Chilli Powder

1/4 tsp Turmeric Powder

1 tsp Paneer Tikka Masala (optional)

1 tsp Oil

Salt to taste

Coriander Leaves for garnish


Heat oil in a pressure pan. Add the onion paste and fry for a minute. Add the ginger and garlic pastes and fry for 2-3 minutes. Add the salt, chilli powder, turmeric powder, and the paneer tikka masala (if using). Fry for a couple of minutes. Add the tomato puree and fry for a minute. Add the drained cow peas and 2-3 cups of water. Pressure cook for 4-5 whistles. Garnish with chopped coriander leaves.


Serve hot with chapattis, bread or rice.

March 15, 2009

Tamata Pappu


This is one of the two "dals" S talks about. I've blogged about Palakkoora Pappu earlier. The "other" dal is Tamata Pappu. In fact, my friend says that her husband only wants these two dals all the time. I had not eaten this dal anywhere, but now we eat it every once in a while.

1 cup Red Gram Dal (Toor Dal)
2-3 Tomatoes, chopped
1 Onion, chopped
1 tsp Roasted Fenugreek Powder
1/4 tsp Turmeric Powder
1 tsp Chilli Powder
2 Garlic Pods, chopped
1/2 tsp Coriander-Cumin Powder
1 tsp Green Chilli Paste
1 tsp Oil
1/4 tsp Mustard Seeds
1/4 tsp Fenugreek Seeds
7-8 Curry leaves
1/4 tsp Asafoetida
Salt to taste
Chopped Coriander Leaves for garnish

Pressure cook the dal with 2-3 cups of water. Mash well and keep aside.

In a pan, heat the oil. Add the mustard seeds, fenugreek seeds and asafoetida. When the mustard splutters, add the curry leaves and the roasted fenugreek powder. Add the onions, green chilli paste and garlic along with the tomatoes. Fry for a minute. Add the cumin-coriander powder, chilli powder, turmeric powder and salt. Add the mashed dal and bring to a boil. Garnish with coriander leaves and enjoy this hot with chapattis. Needless to say, this tastes great with rice.

March 13, 2009

Boondi ki Sabzi


My colleague's mother is a great cook. Even the simplest dishes taste slightly different and anything she dishes out is truly out of this world. I have to sample everything colleague, P, brings in her lunch box. Many a time, I try the recipes at home too. This is one dish which I tried almost immediately. It didn't turn out exactly the way she makes it, but it was very nice.


1 cup Boondi

1 Onion, chopped finely

1 Tomato, chopped finely

1 tsp Ginger Paste

1 tsp Chilli Powder

1/4 tsp Turmeric Powder

1/2 tsp Coriander Powder

1/4 tsp Garam Masala

1 tsp Oil

Salt to taste


Heat the oil in a kadhai. Add the onions and fry for a couple of minutes. Add the ginger paste along with the turmeric, coriander and chilli powders. Add the salt and the tomato and fry for 3-4 minutes. Add half a cup of water and bring the mixture to a boil. Add the garam masala and the boondi. Mix well and serve immediately. This is perfect with chapattis.

March 11, 2009

Paruppu Thuvayal


Food combinations. I always wonder where they come from. Who decided that X shall go with Y or that A should be paired with B. Earlier, I didn't question this at all. Paruppu thuvayal or thogayal was always made with Menthi Kuzhambu or Milagu Kuzhambu. When I decided to make this one evening, S told me that his family makes "Kandi Pappu Pachadi" to go with idlis and dosas.


I made this again when my parents were here and I asked Appa if he wanted to eat this thuvayal with dosas and he was taken aback. I must admit, I was a little surprised when S suggested this, but with some extra red chillies, this thuvayal goes from being a mild accompaniment for rice to a flavourful side for idlis.


1/2 cup Toor Dal

1 tbsp Pepper Corns

1 Red Chilli

1 tbsp Oil

Salt to taste


Heat the oil in a kadhai. Add the pepper corns, red chilli and toor dal. Fry for 4-5 minutes. Add the salt and take it off the flame.

Add enough water to cover the dal and keep aside for 30 minutes. Grind to a fine paste.


Mix this with some hot rice. Enjoy it with some Milagu Kuzhambu. There couldn't be a better way to enjoy a lazy sunday lunch. Off this goes to Divya as she hosts this month's edition of Think Spice... Think Pepper.

March 9, 2009

Roasted Bell Pepper and Egg Tarts


S and I don't host too many dinners or get together. (Have I mentioned before that I am lazy?) So, whenever we are invited to a dinner, I try to take something along. Especially when it is a weeknight and I know that both the people go to work and they don't have a cook. One such Friday evening, we were invited to an impromptu dinner at a friends' place. I made these tarts and took them along. They were great tasting (though the pictures were taken in pretty poor light and make the tarts look so unappetizing).


1/2 cup Flour

1/2 cup Whole Wheat Flour / Atta

1/3 cup Margarine

2-3 tbsp Ice Cold Water

1 tsp Salt

Oil for greasing the tart tins


Grease 4 5" tart tins.


Place the flour, salt and butter in a bowl and mix together till the mixture resembles small peas. Gradually add the water and knead gently till it forms a dough. (Do not knead as you would for chapati/poori dough.) Divide the dough in four portions. Roll out each portion and place it in the tart tin. Bake at 450 F for 10 minutes.


For the filling


2 Onions, sliced thickly
1 each: Red, Green and Yellow Capsicum, chopped

1 tbsp Olive Oil
1/2 tsp Parsley
1/2 tsp Basil
2 tsp Chilli flakes
1/2 tsp Garlic Paste
Salt and Pepper to Taste
1 slice Low Fat Cheese (optional) or 1 cube cheese, grated

2 Eggs, beaten


Heat the olive oil in a saucepan. Add the onion and fry for a minute. Add the parsley, basil and chilli flakes and fry for another minute. Add the capsicum and fry for a couple of minutes. Transfer the vegetables to a foil. Wrap and bake at 400F for 5-6 minutes.


To proceed, fill the semi baked tart shells with the vegetables. Pour the beaten egg over the vegetables and add the cheese, if using. Return to the oven. Bake at 350F for 20 minutes. Carefully remove from the tart tins and serve.


I'm sending these to Roma who is hosting this month's edition of JFI: Wheat.

March 7, 2009

Katrikkai Gojju


In an earlier post, I spoke about the best way to eat Pongal. When Amma was here, I put in my request for Pongal and Katrikkai Gojju. She made it for breakfast one Monday morning. What a way to start the week! This has to be the best accompaniment to the otherwise bland Pongal. And considering I couldn't look at Pongal, let alone relish it, before I discovered Gojju, I don't think this dish needs more marketing.


Ingredients:

1/4 kg Brinjal, chopped

1/3 cup Toor Dal

1/3 cup Chana Dal

1 tbsp Jaggery

Salt to Taste

4 tbsp Tamarind Paste

For the masala:
1/2 tsp Oil

1 tbsp Urad Dal

1 tsp Asafoetida

3 Red Chillies

1 tbsp Coriander Seeds

1 tbsp Chana Dal

1 tsp Fenugreek Seeds

1 tbsp Cumin Seeds

1/2 tbsp Peppercorns
2 tbsp Scraped Coconut


For the tempering:


1 tsp Oil

1/4 tsp Mustard Seeds

1/4 tsp Asafoetida

7-8 Curry Leaves

1/4 tsp Fenugreek Seeds

1 Red Chilli


Cook the dals in a pressure cooker with 2 cups water.

Heat the 1/2 tsp oil in a small kadhai. Add all the ingredients for the masala except the coconut. Roast for 4-5 minutes on a low flame. Add the coconut and fry for another minute. Grind to a fine paste.

Heat oil in a vessel. Add the mustard seeds and asafoetida. When the mustard splutters, add the curry leaves, fenugreek seeds, red chilli and fry for a minute. Add the brinjal pieces and fry for a couple of minutes more. Add the tamarind paste and salt and bring the mixture to a boil. Add the ground masala, the cooked dal and jaggery and simmer for 5-10 minutes.


Enjoy a hearty serving of this gojju with some steaming hot Pongal. That's a plateful of protein goodness.


Off this goes to my dear friend Divya as she hosts this month's edition of Think Spice... Think Pepper.

March 5, 2009

Strawberry Kulfi


Strawberries. I had only tasted the artificial srawberry flavour when I was little. I must admit, I liked it very much. When I was about 8, I was introduced to the flavour of real strawberries. I think it must have been ice cream that I ate in the US. I had a lot of trouble accepting the new flavour as "strawberry" even though I liked it. Today, I enjoy both flavours equally. I can still relish a glass of Strawberry Nesquik as much as I enjoy fresh strawberry milkshake.


I made this kulfi when fresh strawberries were in season. I think I made it during the Valentine's Day weekend. I didn't use any artificial colour and as a result, the kulfi looks a bit pale. But it was delicious.


1 litre Milk

1 tbsp Flour

1 cup Strawberry Pulp

1 tin Sweetened Condensed Milk (I used Amul Mithai Mate)


Heat the milk, condensed milk and flour together and bring to a boil. Do this over a low flame and stir continuously as the condensed milk has a tendency to stick to the bottom of the vessel and get burnt. Cool completely. Mix the strawberry pulp into the milk mixture. Fill the kulfi moulds with this mixture and freeze until set. When set, dip the moulds in warm water, unscrew and hold over a plate. The kulfi slides out effortlessly.


This makes a perfect dessert after a nice Indian lunch on a hot afternoon. Try it! And off this goes to Priya as she hosts this month's edition of FIC-Rose/Pink.

March 3, 2009

Palakkoora Pappu


My cooking is very generic. We eat Konkani food one day, Tamil the next, Italian for lunch, Chinese for dinner. There is really no pattern. This is how it was at our place while I was growing up and this is the "tradition" that I seem to follow. I haven't cooked too many Telugu dishes, primarily because I have very few "family" recipes. This is one dish that I keep hearing about from many people. Each time I buy a bunch of spinach, Sachin would like me to make this dal. A lot of trial and error resulted in this dish which is somewhere between a Keerai Kuzhambu and Dal Palak. No one has complained so far, so I guess I got it right.


1 Bunch Spinach, cleaned and chopped

1 cup Red Gram Dal (Toor Dal)

1/4 tsp Turmeric Powder

2 tbsp Tamarind Paste

1 tsp Green Chilli Paste

7-8 Curry Leaves

1 tsp Oil

1/4 tsp Mustard Seeds

1/4 tsp Fenugreek Seeds

1/4 tsp Asafoetida

1 Red Chilli


Pressure cook the dal with 2-3 cups of water. Mash well and keep aside.


Heat the oil in a pan and add the mustard and fenugreek seeds. When the mustard splutters, add the asafoetida, red chilli, chilli paste and the curry leaves. Add the spinach and cook for 5-6 minutes, covered. Add the tamarind paste and the salt along with the cooked dal.


Bring to a boil and then simmer for 5 minutes. Serve hot with rice and some potato fry.

March 1, 2009

Beetroot Cake


Just like I'd wanted to try making a carrot cake for ages, ever since I discovered blogosphere, I have wanted to try a beetroot cake. I kept reading the different recipes that people put up and I kept buying beetroots. S didn't seem to like the idea of a beetroot cake and so each time I bought beetroots, I ended up making soup. One time, I made a beetroot kurma of sorts. I put it in sambar. In short, everything but the cake.


Since I also feel that whatever the carrot can do the beet can beat! As Amma and Appa were getting ready to leave yesterday, I decided I had to make something for them to take back. This was my chance to experiment. And what a lovely experiment this turned out to be. I will make this again for sure.


1 cup Beetroot, grated

1/4 cup Carrot, grated
1/4 cup Cashews, powdered
2 tbsp Almonds, powdered
¾ cup Brown Sugar
½ cup Oil
1 tsp Cinnamon Powder
A pinch of Nutmeg Powder
2 eggs
1 1/3 cup Flour
1 1/2 tsp Baking Powder
1/2 tsp Baking Soda
¼ cup Raisins


Preheat the oven to 400F (200 C).


Grease and flour/line two 8-inch cake tins.


In a bowl, beat the eggs until light. Add the sugar and oil and beat well. Add the beetroot, carrots, almond and cashew powders and raisins.

In another bowl, sift together the flour, baking powder, and the cinnamon and nutmeg powders. Fold in the beetroot-egg mixture and mix gently until the dry ingredients are moistened. Pour into the prepared cake tins and bake for 30 minutes or until a knife/skewer, inserted into the centre of the cake, comes out clean.
Transfer the cakes to wire racks and cool.


This is a great tea-time cake. It would also pair very well with a glass of milk for an after dinner snack.