Google
 

March 28, 2008

Spirali in Basil Pesto


Pesto is one of those things that I love today but didn't quite know about while growing up. The very first time I heard about it was about 5 years ago. A colleague, who had grown up in the US, told me about it one day while recounting her first cooking experience. So, after trying it out at several restaurants, I decided to make it at home. I made a coriander pesto sometime last year. And whenever I could lay my hands on basil, I made basil pesto. I asked a friend to bring me pine nuts from the U.S. And she did. For the very first time I made basil pesto with pine nuts. I didn't pound the nuts in a mortar, but used my food processor instead.


1 cup Spirali Pasta, Cooked/Boiled with a little oil and salt
1 tbsp Olive Oil
1 tbsp Milk

For the Basil Pesto:

1/2 cup Basil Leaves
1 cube Low Fat Cheese
2 tbsp Pine Nuts
2 pods Garlic
3 tbsp Olive Oil
Salt and Pepper to taste

Grind together all the ingredients for the
pesto.

Drain the pasta and keep aside.

Heat the olive oil in a saucepan. Fry the pesto sauce in it for a few minutes. Add the milk to get a sauce like consistency. Add the pasta and mix well.

This is one of the simplest dishes I have come across and I make it as often as I can. I'm sending this super simple dish to Mathy who is hosting this month's JFI. The ingredient is one of my favourites: garlic.

March 26, 2008

Mixed Fruit Smoothie


Everyday, we carry a huge lunch bag. My mother would be surprised to see me do this. As a child, I hated carrying a lunch bag. I always wanted to carry one bag that could house just about everything I needed to take to school. All my classmates seemed to be doing that. There was just this small, teeny weeny problem. They carried dry lunch. Upma, mixed rice, parathas etc. I had a 4-box tiffin carrier. And a water bottle. To add to my woes, my lunch always included a serving of curd rice. I’ve done crazy things like pack that huge stainless steel monster into my bag (and have curd leak into the bag’s fabric!!). I figured how my classmates brought those light lunches to school. Their mothers made them eat a three course meal (the one I had for lunch) before they left for school. In an attempt to switch my breakfast and lunch, I even tried that. But there was (and is) no way that I can actually eat a three course meal at that hour!


Now, I know better. And I carry a big (but very smart) lunch bag to work everyday. This has, on all days, my lunch, a small container with curd, and a fruit box. On some days, I even carry a small snack like a salad, a granola bar, or some crackers. The idea is to always have something in my bag should hunger pangs strike so I can reach in instead of reaching out (to crisps, corn grits, chips, etc).


Our fruit box has a combination of whatever fruits are in season here. One day S brought his fruit box home as he didn’t have an opportunity to even open it during the day. It just so happened that I didn’t get a chance to touch my box either. So, I emptied the contents of the boxes into the liquidizer and ended up with this lovely smoothie.


1 Apple, cored and chopped
1 Pear, cored and chopped
1 Orange, deseeded
1 cup Guava Nectar


Blend all of the above in a liquidizer and pour into glasses. Add ice if you like and some honey if you want it a little sweeter.


This super simple smoothie is off to Abby who is hosting this month’s Monthly Mingle. It is also off to me as my second entry to this month's AFAM.


Please send in your entries to me on or before the 1st of April. You have a week left before the fruit changes to something else altogether. So, act now!

March 23, 2008

Pumpkin Cake


This month has been very busy for me. I thought last November was the month that would have the least number of posts, but it does look March might replace November. If not, it is likely to give November a good chase. While I am hosting an event this month, my own blog has seen very few posts. I am cooking and baking. In fact, slightly more than usual. But I haven't been finding the time to blog as often.


After seeing Sig and Nupur's posts on Taste & Create, I went to Myamii's blog, For the Love of Food, to sign up for this month's event. This is an event that pairs up willing bloggers and then gets them to create one dish from their partner's blog. I was paired up this time with Ben of What's Cooking. I went to his blog and got carried away for a bit. Then I realized what I was there for. I browsed through a predominantly meat based blog to find something that I could create. I decided the dessert section was best for me. And then I found what I was looking for.


I made a few changes to Ben's Pumpkin Cake and made what he calls a bread. But since I don't frost 90% of my "cakes" I will call this a cake for now.

1 cup Brown Sugar
1/2 cup Oil
2eggs
1cup Flour
1 tsp Cinnamon Powder
1/4 tsp Ginger Paste
1 tsp Baking Powder
1/4 teaspoon salt

1 cup Pumpkin, cooked and mashed

1/3 cup Walnuts, chopped


Preheat the oven to 350F.

Grease a 9 inch cake tin.

Beat the eggs, oil and sugar together. Add the dry ingredients and stir until well mixed. Add the mashed punpkin and beat for a minute. Stir in the walnuts. Pour the batter into the greased cake tin and bake at 350°F for 35 to 40 minutes. Cool on a wire rack and cut into wedges.

We devoured a couple of wedges almost as soon as I cut the cake and it was very tasty. It was just the way cakes ought to be, not too sweet, light and moist. This recipe is a keeper!

Happy Easter all!

March 21, 2008

Lime - n - Lemony Mojito


Favourites. I've found that they always seem to change with time. My signature drink used to be the Screw Driver for as long as I remember. Somewhere along the line, I had an affair with the Cosmopolitan. Then I gave up the long legged pink beauty for the tall, dark, handsome drink. The Long Island Iced Tea. But in the midst of all this, I developed a taste for the Caipiroska and its rum based cousin the Mojito.


The bartender at our favourite restaurant, Earth, makes the best virgin Mojito I've ever had. I've been wanting to make this drink at home. For the very first time, I had all the ingredients (or at least some decent substitutes) at home. The timing couldn't have been better as I was browsing through Mansi's blog the same day and I found her recipe for Old Fashioned Cuban Mojito with Lime and Mint. I modified it a bit and S made this lovely cocktail for us last weekend.


4 fresh Mint Sprigs
2 tsp Brown Sugar
1 tbsp Lime Juice
60 ml Dark Rum
300 ml Limca
2 Limes, cut into quarters
Ice cubes, crushed

Crush the mint leaves along with the brown sugar and lime pieces. Divide this mixture into 2 glasses. Pour in the lime juice and the rum. Add the crushed ice cubes and top with Limca.


Since this drink had Limca, lime juice and lime wedges, it was especially tangy. This is my entry to this month's Monthly Blog Patrol of Coffee's blog, which is guest hosted for the first time by dear Sig. Now, Sig posted her AFAM Pear entry earlier today, despite having to plan for a trip. The only way I can thank her for that entry is by returning the favour. So Sig, this one is for you.

March 20, 2008

Koraishutir Kachuri


I grew up in a completely multicultural environment and had neighbours who belonged to Assam, Bengal, Kashmir, Kerala, Karnataka, Andhra Pradesh, U.P., Punjab, Maharashtra and Gujarat. Pretty much on the same street. Of course, there were people from Tamilnadu as well. And for quite a while, we all ran in and out of each other's houses, had our meals in whosever house we happened to be at that mealtime, and came back home at the time our mothers told us to. I always feared I'd turn into a pumpkin if I didn't get home at 6 (or 8 or 10 or 11 as my curfew time got extended.) But I never bothered to find out anything about the food I ate at these different homes. Would you all believe that, at one point in time, I had NO interest in food?


While I may have eaten all kinds of food, it is only in the last 6 years that I've started trying things out at home. So, from dal parathas to sandesh to dosas to pastas, I'd love to give anything at least one chance in my kitchen. OK, there are exceptions.


Since I've not traveled in the eastern part of the country, my exposure to the cuisines in this part is unknown territory to me. By that measure, I haven't been to China, Mexico or Italy, but I seem to cook their food often. Hmmm, maybe the restaurants that got me interested have something to do with this. I have heard of one Bengali restaurant in Delhi, but have never been to it. I've always associated Bengali food with the numerous milk sweets. Food events take your interest level in a certain cuisine up by a few notches. There are some blog events that I love. They help me take walks down what I'd otherwise consider blind alleys. And then, participating in a much loved event like the RCI, seems like a walk in the park and not in a blind alley.

Photobucket


While I really wanted to make something else, I came across this recipe at Sutapa Ray's Bengali Recipes. I modified it to suit my taste and pantry.


Ingredients:

1 cup Atta
1 tbsp Oil + 1 tsp Oil
2 tsp Green Chilli Paste
Salt to taste
2 tbsp Aniseed
¼ tsp Asafoetida
1 cup Peas, shelled
1 tsp Ginger Paste
Oil for deep frying

Take the atta in a mixing bowl. Add the tablespoon of oil and some salt. Add a little water at a time and knead to a soft dough.


Grind the peas, ginger and chilli pastes and aniseed to a fine paste. In a pan, heat the teaspoon of oil. Add the asafoetida and fry for a minute. To this, add the peas paste and salt. Fry well till the paste is cooked. Remove from the fire and let it cool. Divide this mixture into 8 portions.


Divide the dough into 8 balls. Roll out each ball into small circle and fill it with the pea mixture.Bring the edges together and seal them. Roll out as for puris. Deep fry in hot oil till golden brown. Drain on absorbent paper.


My neighbour made this sometime back and served it with a chana dal and coconut dish. This is so similar to the Vatanya Nevryo that Amma makes from time to time. I plan to make something else for RCI too, but this month being as busy as it is, I don't want to have deadlines go by for one of my favourite events and then kick myself for not having sent a recipe in.

This goes to Sandeepa who is hosting this month's RCI - Bengal. Thanks Sandeepa and Happy Hosting. I'd also like to wish all of you a very Happy Holi.

March 19, 2008

Baked Kaela Phodiyo (Baked Banana Fritters)


Don't you all love munching on fried goodies? I do. And fritters of some sort used to be on our Sunday lunch menu. Almost always. Raw banana fritters or Kaela Phodiyo topped the list, in terms of frequency and in terms of favourites. I remember this one time when my parents were in Holland and one of the trees in our banana patch yielded the raw banana variety! Since H and I were left to our own devices, we had raw banana fritters almost every other day. OK, so once in a while, we also had vazhaikkai karumadhu. At that age, I don't think we worried so much about the consumption of oil. I was all of 14, and he, 19.


I've been trying to bake several things that are conventionally fried. I've blogged about the Baked Cashew Onion Pakodas earlier. Since these fritters don't involve dripping batter, I've found that baking instead of frying works.


2 Raw Bananas, cut in half and sliced lengthwise


2 tsp Chilli Powder


1 tsp Turmeric Powder


1/4 tsp Asafoetida


1 tbsp Rice Flour


2 tbsp Oil


Salt to taste


Place the banana slices on a plate and apply the salt, chilli powder, turmeric powder and asafoetida. Keep aside for 10 minutes.


Preheat the oven to 400 F.


Apply the rice flour to the banana slices so that the released liquid is absorbed. Coat the slices with oil and place them on a greased baking sheet. Bake for about 20-25 minutes. Cool these fritters on a rack before you attack them.


I enjoyed this round of guilt free eating while S said the fried ones taste better. Of course they do, there's no denying that. But the deep fried version does not make for guilt free eating. So, eat away.

And here's a gentle reminder to all of you. Please send in your entries to this month's AFAM and make my first blog event hosting experience a huge success.

March 15, 2008

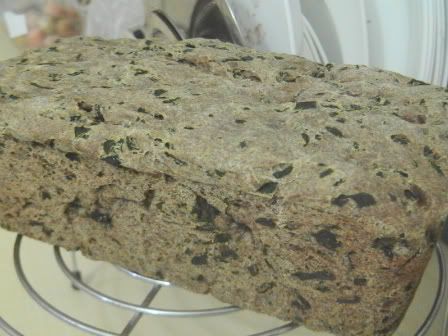
Ragi Wheat Methi Loaf


I’ve been trying my hand at baking with yeast. But I keep getting these vague ideas that I am so keen on implementing. For instance, ever since my friend brought me Ragi (finger millet) flour from Madras, I’ve been itching to make Ragi bread. I’d once tasted this bread at a small bakery called Ofen at Banjara Hills in Hyderabad.


There’s a twist in this tale though. I had a bunch of cleaned methi leaves in the fridge and wanted to make use of those. We’d eaten quite a bit of the regular methi fare during the winter and I was itching to try something different.


I can’t say this is the best bread I’ve eaten, but it was fairly decent when we had it, toasted lightly, with tea.

Photobucket


1 cup Flour

1 cup Ragi Flour

1 cup Atta

1 cup Water, warm
1 tsp Yeast
1 1/2 tbsp Oil
3/4 tsp Salt
1 cup Fenugreek Leaves, chopped

1 Onion, finely chopped

1 tsp Oil

1/2 tsp Turmeric Powder

1/2 tsp Chilli Powder

1/2 tsp Cumin Powder

1/2 tsp Coriander Powder

Salt to taste

Prepare the fenugreek mixture by heating a teaspoon of oil and frying the onions. Add the fenugreek leaves, turmeric, chilli, cumin, and coriander powders along with the salt. Cover and cook for a few minutes. Keep aside.


Take a huge mixing bowl and place the oil, salt in it. Add water and mix until the salt dissolves. Add the yeast and mix well. Add the flours along with the fenugreek mixture and knead into a dough. Place the dough in a greased vessel and cover it with a damp muslin cloth. Allow to rise until double in size (roughly 45-50 minutes).


Knead the dough for a minute and shape into a loaf. Fit this into a greased loaf tin. Allow to rise for another hour or 90 minutes.


Bake at 375 F for about 25 minutes. Cool on a wire rack and then cut into slices.

There, I have another loaf that I can add to my small collection. I am sorry for being irregular here as well as at your blogs. Its the busiest time of the year for me at work and I also have my in-laws visiting me for the first time since we got married. So, getting home at 9 and cooking for 7 people after that leaves me with little time to blog. Don't also forget that the AFAM March is on for another 15 days. Please do send in your entries.

March 6, 2008

Cauliflower Cheese Parathas


I love using up leftovers. These days we don't have as many leftovers as I am learning to cook just what we need. But every now and then, we do end up with stuff. In more ways than one, it makes my life easier when I have something. But at times, I tend to think up more than one dish with the leftovers and can't decide. So, my maid gets to take extra stuff home on those days. I'd much rather someone eat the stuff than waste it.

On several occasions, we are left with rotis. I try and make something nice so the rotis aren't boring. Kothu Roti and Egg Paratha are some of the things I've tried. I tried Amma's cauliflower and cheese paratha recipe with used up rotis (she makes them fresh). Since the cheese melts, the rotis stick together. This one's a keeper.


6 Rotis
1/4 cup Cauliflower, grated

1/4 cup Cheese, grated

1 tsp Coriander leaves, finely chopped

1/2 tsp Chilli Paste

1/2 tsp Ginger Paste

Salt to Taste

Oil for frying

Heat a griddle (tawa) and grease it lightly.


Mix the cauliflower, cheese, coriander, chilli paste, ginger paste and salt and keep aside.


Place a roti on the griddle and spread some of the cauliflower cheese mixture on to it. Spread the mixture evenly over the roti. Cover this with another roti and cook for a couple of minutes. Turn it over and cook on the other side for a couple of minutes. Use a little oil for frying. Take it off the griddle and cut into quarters. Serve hot with tomato ketchup.

Off these parathas go to Mansi who is hosting this month's WBB, my dear friend Nandita’s initiative. This month's theme is "Balnced Breakfasts" and she urges us to include Fruits or Vegetables, Grains, Dairy or Protein. I have used all four four food groups in this dish. The rotis are made from wheat flour and soya flour. The stuffing has cauliflower and cheese. I couldn't have gotten a better dish.

March 2, 2008

Ginger Pear Muffins and Announcing AFAM March

There was a little girl
Who had a little curl
Right in the middle of her forehead;
And when she was good
She was very, very good,
But when she was bad she was horrid.


Much as I hated having this as the nursery rhyme that best described me, I have now come to terms with it. There is nothing that comes close to describing the mischievous, short tempered child that I was (and continue to be). I was the baby of the house, the youngest grandchild on both sides of the family. My tantrum throwing, my stomping out of the room, and everything associated with that is still remembered by every member of my family. And they will probably never let me forget it.

I was born with very sensitive skin and there were (and are) very few things that actually agreed with me. So, my parents thought it best to stick to only those things, expensive as they may be, rather than deal with the allergic reactions. So, I even had a special soap. When I was a little older, I fought with Amma about that as well. Why did everyone in the house get to use that nice green soap when I had to use that brown soap? She tried to explain to me that it was special, but I would have none of that. So, I started using the green soap only to quickly revert to the “one and only” for me.


What is this boring story doing on my food blog? Why is it part of the post that is meant to announce the fruit of the month?


It is only because the two have something in common. The soap that I have been using ever since “the great revert” is proud to be the fruit of the month: Pears!


A Fruit A Month is an event started by Maheswari of Beyond the Usual. This is my first time hosting any event and I am grateful to Maheswari for this opportunity.


You can join the party as long as you follow these simple rules:


1. Prepare any kind of dish with Pears of any kind and post the recipe on your blog in the month of March.
2. Add a link back to this event announcement (feel free to use this logo):


3. Please send me an e-mail at onlineraga@gmail.com with the following info.

  • Subject Line: AFAM
  • Your name
  • Your blog name
  • A picture of the dish if you have one.

4. Non bloggers can e-mail me the recipe and the picture and I will include it in the round up.
5. Deadline is April 1, 2008 and the round up will be posted in the first week of April.


I am so excited about this event. I’m kickstarting it with my favourite kind of baked goodie: the humble muffin. I found this recipe a long time ago and I don’t recollect where I found it. The word document where I’ve saved it has a footnote that says, “Source: Mollie Katzen’s Sunlight Café”. I bought crystallized ginger to make these, but have been munching on them everyday since the day I brought the packet home.


Ginger-Pear Muffins


1 cup Pears, peeled and finely chopped
1 tbsp Lemon Juice
2 cups Flour
½ tsp Salt
1 ½ tsp Baking Powder
1/3 to ½ cup Sugar
1 tbsp Lemon zest, grated
1/3 cup Crystallized Ginger, very finely minced
1 cup Buttermilk
1 Egg
2 tsp Fresh Ginger, ground
1 tsp Vanilla
4 tbsp Unsalted Butter, melted


Preheat oven to 375ºF. Prepare the muffin pans by lining them with paper muffin cases.


Place the chopped pear in a shallow dish, drizzle with lemon juice, and set aside.


Combine the flour, salt, baking powder, sugar, and lemon zest in a medium sized bowl. Stir in the minced crystallized ginger.


Blend the buttermilk with the egg, fresh ginger, and vanilla, and beat gently with a fork or a small whisk until smooth.


Slowly pour this mixture, along with the melted butter, into the dry ingredients. Add the pear as well. Using a spoon or rubber spatula, stir from the bottom of the bowl until the dry ingredients are all moistened.

Spoon the batter into the prepared muffin cups. Bake in the middle of the oven for 20 to 25 minutes, or until lightly browned on top and a toothpick inserted into the center comes out clean. Remove the pan from the oven, then remove the muffins from the pan and place them on a rack to cool.


I also baked some plain vanilla cupcakes to take along for a picnic yesterday. We took about 50 kids from an NGO on a Delhi Metro ride and showed them the Red Fort. I followed my Golden Glow cake recipe and baked them in mufifn cases for 15 minutes at 375ºF. After 10 minutes of baking, I planted some Cadbury's Gems on top. They cracked during baking and some chocolate oozed out. I thought that was a bad thing until I realized that the chocolate added to the overall appeal. The kids loved them and more than the kids, the adults from my office demanded another batch. Meeta's monthly mingle had the theme of "Drop in & Decorate" some time ago. While I didn't participate then, I am glad I made 50 underprivileged kids happy yesterday.